Understanding n8n: Architecture and Core Concepts
 Image credit: n8n.io
Welcome to this guide on n8n! 👋
Table of Contents
What is n8n?
n8n is a powerful, free, and open-source workflow automation tool. It enables you to connect different applications and services to automate repetitive tasks without extensive coding. You can design complex workflows visually, using a wide array of pre-built nodes for popular apps and services, or even create your own custom nodes. This flexibility makes n8n a versatile solution for personal projects, business process automation, and more.
Core n8n Architecture
Understanding n8n’s architecture helps in leveraging its full potential, especially when it comes to scaling, customizing, or embedding n8n. While deep technical details can be extensive, here’s a high-level overview of its key components:
Key Components
The n8n Editor (Frontend/UI):
- This is the visual interface where you design and manage your workflows.
- It’s a web application, typically built with modern JavaScript frameworks.
- When you create a workflow, the editor essentially generates a JSON representation of that workflow.
Workflow Execution Engine (Backend/Worker):
- This is the core engine responsible for actually running your workflows.
- It takes the JSON definition of a workflow and processes it step-by-step.
- It handles node execution, data transformation between nodes, error handling, and logging.
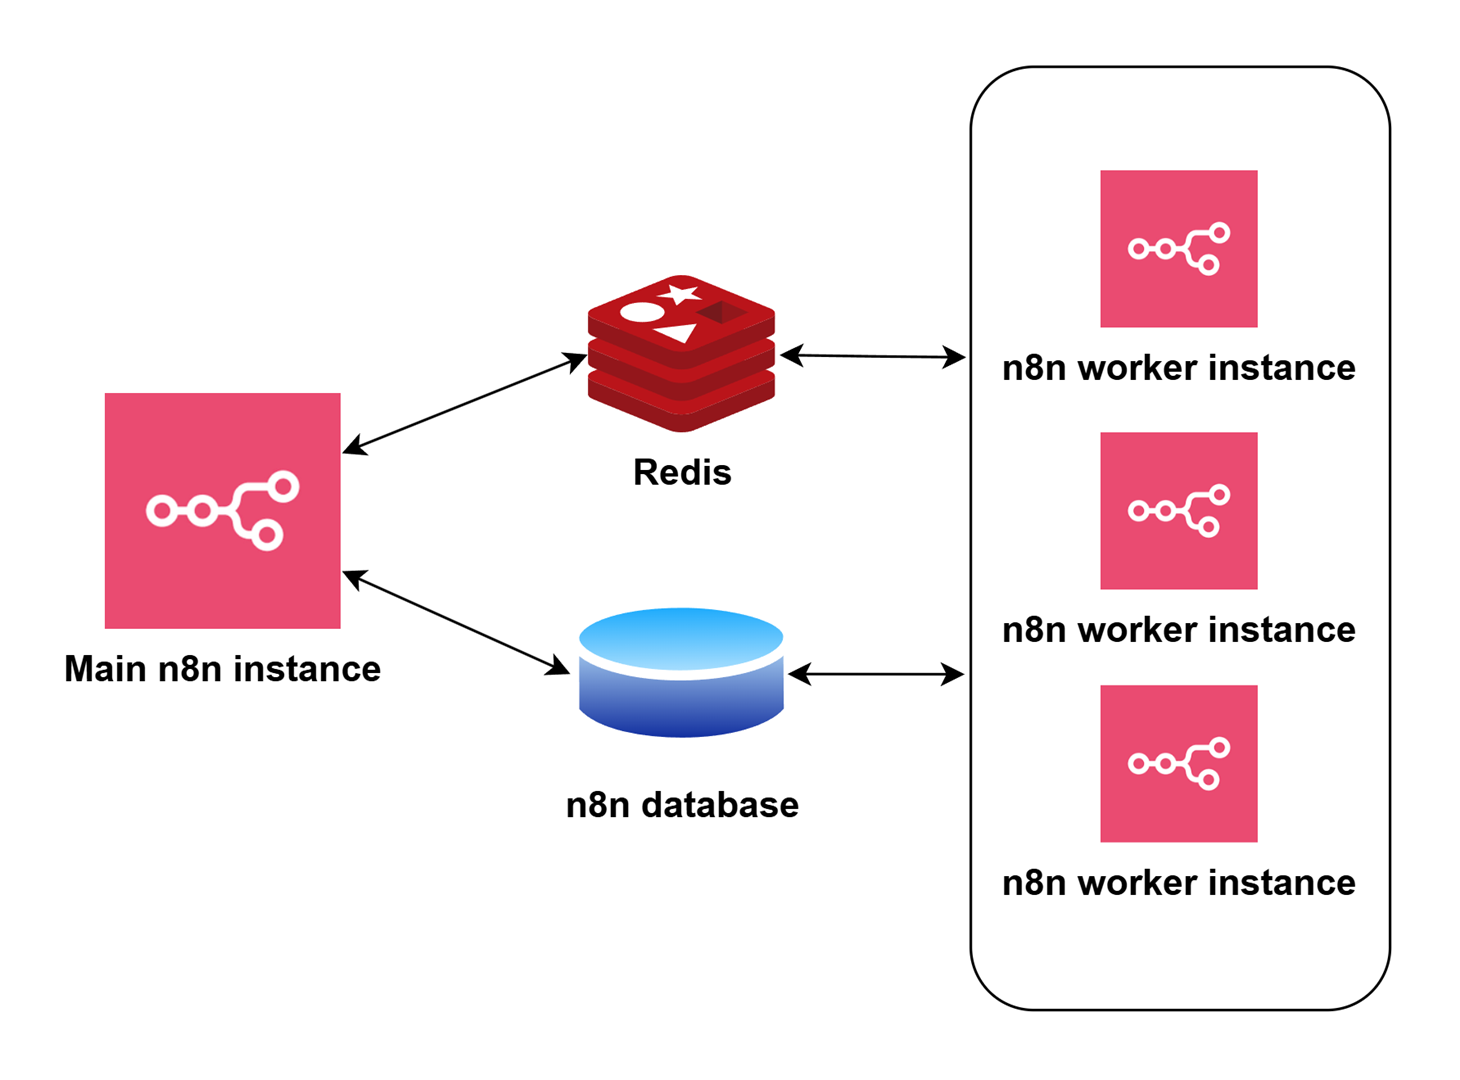
- For scalability, n8n can run in different modes, including a “main” process and separate “worker” processes that can handle concurrent workflow executions. This is often referred to as “Queue Mode” for more robust, production-grade deployments.
Nodes:
- Trigger Nodes: These are special nodes that start a workflow. They can be activated by webhooks, schedules (cron), manual triggers, or events from third-party services.
- Regular Nodes: These perform specific actions like reading data from a database, sending an email, manipulating data, making API calls, or implementing custom logic.
- Each node is essentially a self-contained unit of code (often JavaScript/TypeScript) that performs a specific task.
Database:
- n8n uses a database (SQLite by default, but PostgreSQL and MySQL/MariaDB are supported for production) to store:
- Workflow definitions
- Credentials for connecting to various services
- Execution logs and history
- User data (if user management is enabled)
- n8n uses a database (SQLite by default, but PostgreSQL and MySQL/MariaDB are supported for production) to store:
REST API:
- n8n exposes a REST API that allows for programmatic interaction. You can use this API to manage workflows, trigger executions, retrieve execution data, and more, enabling integration with other systems.
How It Works Together (Simplified Flow)
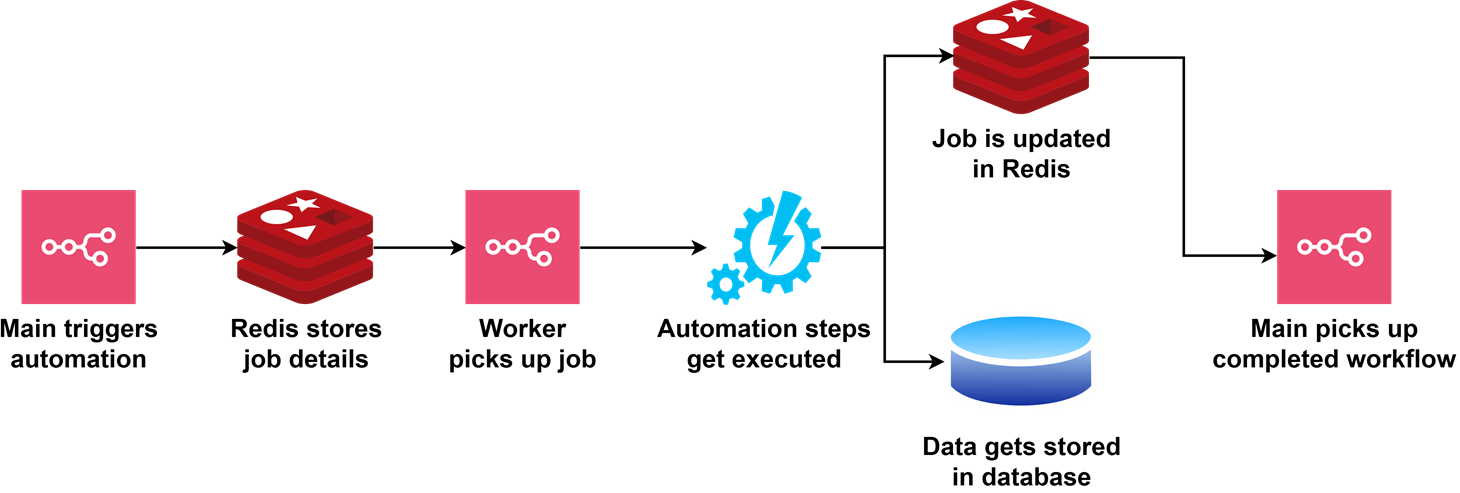
- Design: You design a workflow in the n8n Editor. Your workflow is saved as a JSON object in the database.
- Trigger: A trigger node initiates the workflow (e.g., an incoming webhook request, a scheduled time).
- Execution:
- The Workflow Execution Engine loads the workflow’s JSON definition from the database.
- It starts with the trigger node and executes subsequent nodes in the defined order.
- Data output from one node becomes the input for the next, allowing for complex data flows and transformations.
- The engine communicates with external services as defined by the nodes (e.g., fetching data from an API, sending a message to Slack).
- Logging: Execution details, including successes, failures, and data at each step, are logged in the database.
Scalability Considerations
- Execution Modes: n8n can run in a single
mainprocess mode (default, good for smaller setups) or aqueuemode with dedicated worker processes for better performance and scalability, especially when handling many concurrent workflows. - Database Choice: For production environments, using PostgreSQL or MySQL/MariaDB instead of SQLite is recommended for better performance and reliability under load.
- Resource Allocation: Sufficient CPU, memory, and network bandwidth are crucial, especially for worker instances handling complex or high-volume workflows.
Planning Your Custom Node
Before writing any code, it’s important to plan your custom n8n node carefully. This ensures your node is maintainable, user-friendly, and fits well within your workflow automation goals.
1. Choosing the Node Type
n8n nodes generally fall into two categories:
- Trigger Nodes: Start workflows when an event occurs (e.g., webhook received, new email).
- Regular (Action) Nodes: Perform actions or process data within a workflow (e.g., HTTP request, data transformation).
Questions to consider:
- Should your node initiate workflows (Trigger) or process data mid-flow (Action)?
- Does your node need to poll an external service, or will it wait for incoming events?
2. Selecting a Node Building Style
n8n supports two main approaches for building nodes:
- Declarative Style: Uses JSON to define node properties, inputs, outputs, and operations. This approach is simpler, more maintainable, and recommended for straightforward integrations.
- Routing-Based Development: Declarative style excels at creating HTTP-based nodes through a routing system.
- Simplified API Integration: Easily map API endpoints to operations without complex code.
- Operation-Centric: Define multiple operations (GET, POST, PUT, etc.) in a structured way.
- Programmatic Style: Uses TypeScript code to define node behavior, offering more flexibility and control for complex logic or custom functionality.
Declarative Style Example with HTTP Routing:
{
  "name": "MyApiNode",
  "httpRequestDefaults": {
    "baseURL": "https://api.example.com/v1",
    "headers": {
      "Accept": "application/json"
    }
  },
  "properties": [
    {
      "displayName": "Resource",
      "name": "resource",
      "type": "options",
      "options": [
        {
          "name": "User",
          "value": "user"
        },
        {
          "name": "Product",
          "value": "product"
        }
      ]
    },
    {
      "displayName": "Operation",
      "name": "operation",
      "type": "options",
      "options": [
        {
          "name": "Get",
          "value": "get",
          "routing": {
            "request": {
              "method": "GET",
              "url": "=/{{$parameter.resource}}/{{$parameter.id}}"
            }
          }
        },
        {
          "name": "Create",
          "value": "create",
          "routing": {
            "request": {
              "method": "POST",
              "url": "=/{{$parameter.resource}}",
              "body": "={{$parameter.data}}"
            }
          }
        }
      ]
    }
  ]
}
Programmatic Style Example:
export class MyCustomNode implements INodeType {
  description = {
    displayName: 'My Custom Node',
    // Other properties
  };

  async execute() {
    // Custom logic implementation
    // More flexibility and control
  }
}
You can also use a hybrid approach, combining declarative definitions with programmatic execution when needed.
Repository Layout for n8n-node-starter:
When developing custom nodes using the n8n-node-starter template, your project structure will typically look like this:
n8n-nodes-my-custom/
├── credentials/          # Credential definitions for your nodes
│   └── MyServiceApi.credentials.ts
├── nodes/                # Your custom node implementations
│   ├── MyService/
│   │   ├── MyService.node.ts           # Main node implementation
│   │   ├── MyService.node.json         # Declarative definition (if used)
│   │   └── descriptions/               # Localized descriptions
│   │       └── MyServiceDescription.ts
│   └── actions/                        # Reusable actions
│       └── common.ts
├── package.json          # Project configuration and dependencies
├── tsconfig.json         # TypeScript configuration
├── .eslintrc.js          # Linting rules
├── README.md             # Documentation
└── LICENSE.md            # License information
Test Node: You can test your node as you build it by running it in a local n8n instance.
- Install n8n using npm:
npm install n8n -g
- When you are ready to test your node, publish it locally:
# In your node directory
npm run build
npm link
- Install the node into your local n8n instance:
# In the nodes directory within your n8n installation
# node-package-name is the name from the package.json
npm link <node-package-name>
3. Designing the Node UI
The user interface for your node in the n8n Editor is defined by its description object:
- Display Name & Description: Choose clear, concise names and helpful descriptions.
- Inputs & Outputs: Decide how data will flow into and out of your node.
- Parameters: Plan which fields, dropdowns, credentials, and options users will interact with.
- Defaults & Appearance: Set default values and color for easy identification.
Tips for UI Design:
- Group related parameters for clarity.
- Use descriptive labels and tooltips.
- Minimize required fields to streamline the user experience.
- Consider advanced options for power users, but keep the main UI simple.